Stock Count Templates exist in Restaurant365 to create Stock Counts when Inventory is counted. Stock Count Templates can be found in the Inventory section of the Operations Module of Restaurant365, as well as on the R365 Classic App (Black).
This article will cover the following:
- Reviewing the list of existing Templates
- Creating a new Stock Count Template
- Adding Storage Locations
- Adding Items
- Changing the sort order
Overview
Stock Count Templates are saved templates containing specific Inventory Items, sorted by a User defined 'Storage Location'. Storage Locations represent physical locations at the Restaurant Location. Stock Counts are created from a specific Stock Count Template each time inventory is counted at a Restaurant Location.
Navigation
Stock Count Templates can be accessed via Browser, as well as via Mobile App. Stock Count Templates can only be created via Browser. For full navigation information, please refer to the Stock Count Overview.
Stock Count Templates List

Navigate to the Stock Count Templates list view to review any existing Stock Count Templates. The assigned Location, Name, Frequency, and whether or not a the Template is ‘In Use’ will be visible on the list view for each Stock Count Template.
- Note: A Stock Count Template should only have one active physical count associated with it at a time. As long as the related active Stock Count transaction is in progress (meaning it has a status of ‘Unapproved’), the Stock Count Template will be flagged as ‘In Use’.
Create a New Stock Count Template
A User must have the Security Role of 'Accounting Manager' or be a User with the 'Restaurant Manager' Security Role with the Secondary Security Role of 'Master Record Save'. Please refer to the Stock Count Overview for more information on Security Roles.
Stock Count Templates can be created in two different ways:
- via Browser
- via Template (Excel file)
Modifying Stock Count Templates
Stock Count Templates can be modified as needed at any time. This includes both the adding or removing of Purchased Items from the Stock Count Template.
Adding
If you start carrying a new product that needs to be counted on your Stock Counts, open the Stock Count Template where the new Purchased Item will be added, and add it using the same steps as outlined below.
Removing
If a Purchased Item is no longer carried at your Restaurant Locations and it will no longer be counted on Stock Counts, you can remove the Purchased Item from the Stock Count Template.
- Note: If a Purchased Item is removed without first being 'zero'd out', the Stock Count form will automatically assume a count value of '0' for that Purchased Item, even if it has been removed from the Stock Count Template. The User will receive an alert to notify them that the quantity of '0' is assumed. This is to ensure that the previous count values are updated and removed from your General Ledger. On the 'Item Review' tab, the removed Purchased Item will be listed with a Flag of 'Assumed 0'
Modifying Stock Count Templates Via Browser

To create a new Stock Count Template within Restaurant365, hover over the 'Item' menu in the top ribbon and select 'New Stock Count Template'. This action will open a new tab with a blank Stock Count Template.

1) Name - This represents how this Stock Count Template is displayed and referenced on future Stock Counts
2) Frequency - This User-defined field states how often this Stock Count Template will be used (i.e., 'Nightly', 'Weekly', 'Every Two Weeks' etc.)
3) Location - The Location for the Stock Count Template. Stock Count Templates and Stock Counts are unique to each Location in Restaurant365
4) In Use, Last Stock Count, and Last Stock Count Date - These values will be updated as the Stock Count Template is used
5) Mobile Qty Entry - This setting can be updated on each Stock Count and allows multiple Users to work on the same count at once via the R365 Classic App (Black). Settings include: “Replace Qty” or “Add to Current Qty”. The default setting is ‘Replace Qty’. This means that when a Stock Count has values that have been entered and saved, but the Stock Count has not been approved, another count value can be saved over, replacing, that value on the Stock Count. The second option of ‘Add to Current Qty’ allows users to keep existing values that have been entered in to the Stock Count and add additional counts on top of them.
- ‘Replace Qty’ Example
- First Saved Value: 10
- Second Value Entered: 7
- Final Value Saved: 7
- ‘Add to Current Qty’ Example
- First Saved Value: 10
- Second Value Entered: 7
- Final Saved Value: 17
Note: Completed Stock Count Templates can be 'Copied' to other Locations so that similar templates do not have to be created twice inside the system. To 'Copy' a Stock Count Template once it has been completed, hover over 'Action' and select 'Copy'.

Upon completing the Header information on the Stock Count Template, hover over 'Save' and save the template.
- Note: It is recommended that when working on records with large amounts of manually entered data that the record be saved frequently to avoid any data loss due to dropped internet connections.
Storage Locations

Storage Locations represent the physical locations where inventory is stored at the Restaurant level. Storage Locations are User defined and the order in which the Storage Locations appear in the Storage Location list represents the order in which they will appear on Stock Counts (top being first).
- Note: Storage Location names cannot be edited once they are created. If a Storage Location name needs to be changed, delete the Storage Location by clicking on the trash can icon and replace it
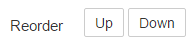
Storage Locations can be reordered without the need to delete or add new Storage Locations. To reorder Storage Locations, click on the Storage Location name and then click the 'Up' or 'Down' buttons
Items

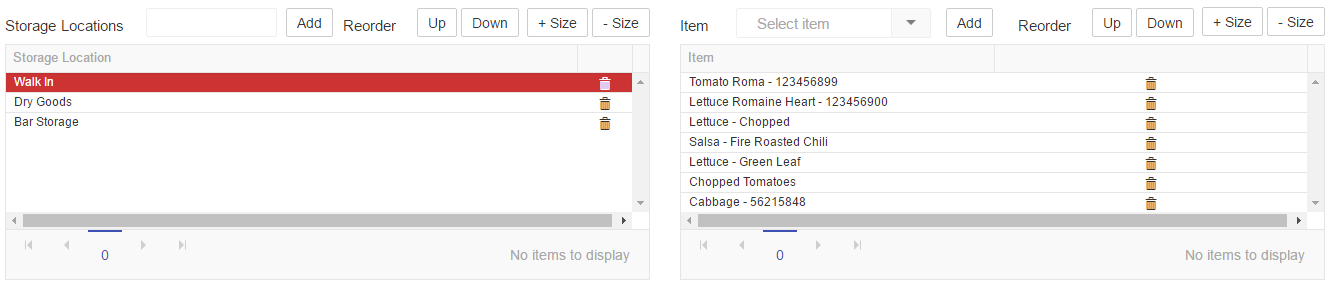
Items represent the Inventory Items that will be counted on Stock Counts. Inventory Items will be added to each Storage Location, and will have their own respective order. To add an Inventory Items to a Storage Location, first select the Storage Location in the Storage Location list, then click the 'Select Item' drop-down to find and select the Item to add. Highlight the Item name by clicking on it in the list, then click the 'Add' button to add the selected Item to the Storage Location.
- Note: If an Item name (or corresponding Item Number) is not fully displayed, hover the mouse over the Item name and a tool-tip will display the entire contents of the Item Name / Item Number as shown below.
Continue this process until all desired Inventory Items have been added to the Storage Location. If Items need to be resorted, perform the process by highlighting the desired item and clicking 'Up' or 'Down' to resort the Item in the Storage Location.
- Note: an Inventory Item can exist within multiple Storage Locations, meaning it can be counted multiple times on the same Stock Count sheet.
Upon completing each Storage Location, repeat the process for each additional Storage Location until complete.
Ensure to Save the record after all Items have been added to the desired Storage Locations. The Stock Count Template is now ready to be used for performing Stock Counts. Click here for more information on Stock Counts via Browser and Stock Counts via Mobile App.
Modifying Stock Count Templates via Template (Excel file)
Step 1: Download the Stock Count Excel File

To create a new Stock Count Template in Excel, first obtain the Excel Template. This can be obtained from most recent version of the R365 Inventory Master Template, or from within the Import Tool in Restaurant365. To obtain the Excel Template from the Import Tool, hover over 'Administration' in the top ribbon and select 'Import'.

On the Import Tool, set the desired parameters as shown below, then click the 'Download Template' button. Once obtaining a copy of the Stock Count Template Excel Template, open the file and proceed to the next step.
Step 2: Export the Item List

In order to import the Inventory Items and their respective Storage Locations on a Stock Count Template, the User must have the exact spelling of the Item name. Navigate to the 'Items' list view in the 'Inventory' subsection of the Operations Module, and export the Items list by clicking the Export button the top right corner.
Step 3: Fill out the Excel Template
![]()
Similar to other templates in Restaurant365, the first several columns of the Excel Template represent the header information of the record that will be created upon import in to Restaurant365.
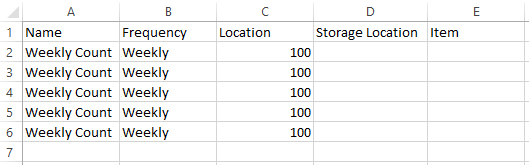
Complete the Header information in the Excel Template by filling in columns A, B and C. The values in these three columns must be identical for every line item on the template as shown below
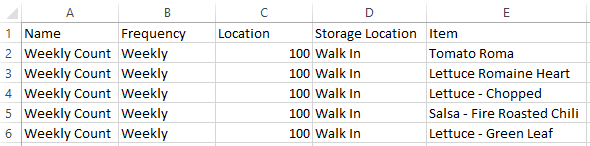
Next, add a Storage Location, and begin adding Items to the Storage Location. It is recommended that the User Copies/Pastes the Item Names from the 'Name' column (column A) on the Item list that was exported in previous step. This will reduce any data entry error, and ensure a smoother import. If Item names are entered incorrectly, the import will fail as the system will not be able to find an Item with the name provided.
- Note: the order in which the line items are listed (for both Storage Locations and Items) will be the order in which they will appear on the Stock Count Template upon importing
Continue the process for each Storage Location and its respective Items until the Excel Template is complete. Ensure that the values in Columns A, B, and C have been copied to all line items in the Template, then save the Template as a CSV in preparation for importing.
Step 4: Import the File
Return to the Import Tool and set the import parameters as shown above. Select the prepared CSV and proceed to follow the steps to Import. Upon successful import, the Stock Count Template is now ready to be used for performing Stock Counts. Click here for more information on Stock Counts via Browser and Stock Counts via Mobile App.